
SPF vs DKIM A Guide to Cold Email Deliverability
SPF vs DKIM explained. Learn how they work together, why both are critical for cold email deliverability, and how to configure them to avoid the spam folder.
Read article
If you're using Gmail or Google Workspace for cold outreach, your SPF record is a special line of code added to your domain's DNS that stops spammers from faking emails from your address. It's a simple but powerful way to tell other email servers, "Any email coming from Google's servers on my behalf is legit." Getting this right is a critical first step to staying out of the spam folder.
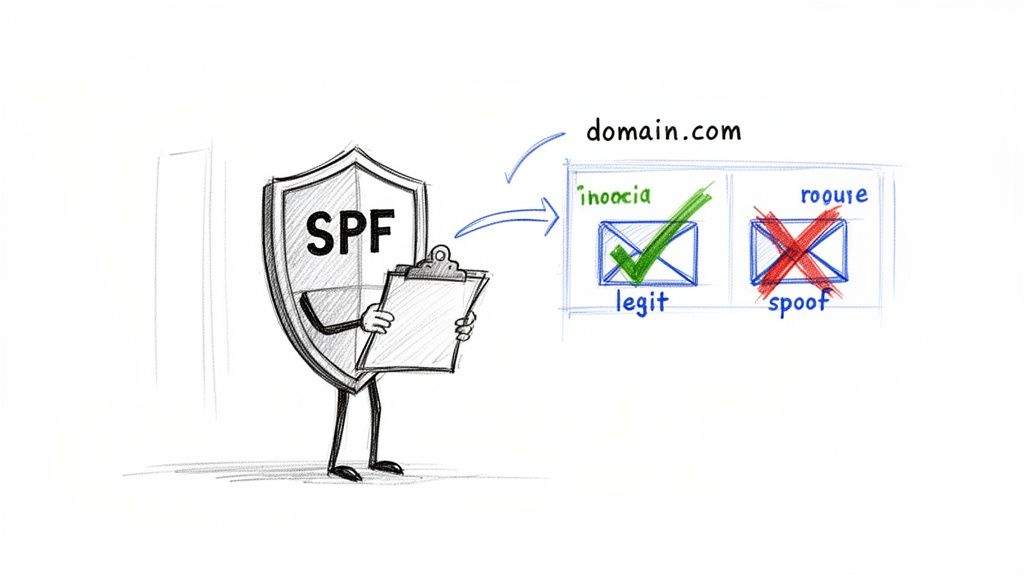
Think of an SPF record as a digital bouncer for your email domain. SPF stands for Sender Policy Framework, and its main job is to protect your reputation by checking the ID of every email that claims to be from you. Without this bouncer, any scammer on the internet can send emails pretending they came from your domain—a nasty trick called "spoofing."
For anyone using Google Workspace, this isn't just a friendly suggestion; it's an absolute must. Google's spam filters have gotten incredibly smart and are now very strict about authentication to fight off the endless waves of spam and phishing attacks. When an email shows up without a valid SPF record to back it up, Gmail's servers immediately see it as suspicious.
This is a deal-breaker, especially if you're doing cold email outreach. A missing or broken SPF record is one of the most common reasons why well-written campaigns go straight to spam. All that hard work is wasted before your prospect even has a chance to read your message.
You see this pop up constantly in Reddit communities like r/coldemail, where someone complains, "My open rates just dropped to zero!" A quick check often reveals their SPF record is missing or broken, causing their emails to fail authentication and land in spam. This isn't a rare technical glitch; it's a fundamental requirement for anyone sending cold emails at scale.
Imagine you've sent thousands of invitations to an exclusive event, but you forgot to give the security team a guest list. They'd probably turn most people away at the door. That's exactly what happens to your emails without SPF—Gmail's security has no way to confirm they're supposed to be there.
Setting up your SPF record for Gmail correctly does more than just check a technical box; it actively builds trust with every email server you interact with.
Verifies Legitimacy: It serves as official proof that emails sent from Google’s servers are actually from you.
Reduces Spam Placement: It drastically cuts down the chances of your outreach emails getting flagged as spam.
Protects Brand Integrity: It stops scammers from hijacking your domain to send phishing emails, which protects your brand's good name.
At the end of the day, a proper SPF setup is the foundation of a good sender reputation. It’s a crucial part of a bigger understanding of digital authentication that signals to the world that your emails are credible. Without it, you're starting every email campaign at a huge disadvantage.
When you’re setting up Google Workspace to send emails from your domain, getting the details right is everything. Thankfully, Google makes it simple. They provide one standard SPF record that covers every single user.
Think of this little snippet of text as the official permission slip you give to the world's email servers, letting them know that Google is allowed to send emails on your behalf.
For any standard Google Workspace or Gmail account, this is the only SPF record you'll need:
v=spf1 include:_spf.google.com ~all
That's it. Resist the urge to add other mechanisms or tweak this text. It's a surprisingly common mistake—you'll see it pop up in forums and Reddit threads where well-meaning users accidentally break their own email setup. Stick to this exact format unless you're an advanced user who is deliberately authorizing another service, like a cold email sending platform.
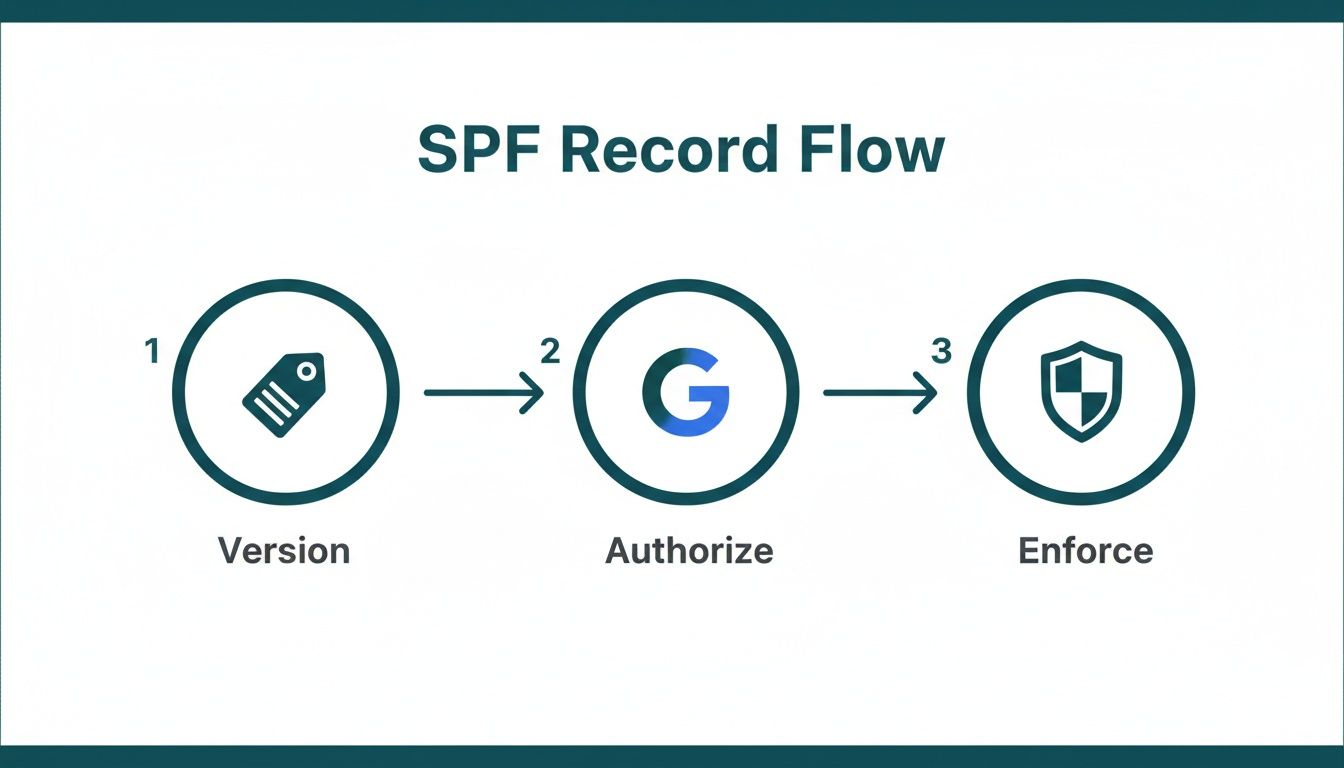
That simple command might look like code, but it's really just three distinct parts, each with a specific job. Let's pull it apart to see why this exact sequence is so crucial for protecting your domain's reputation.
Here's a quick look at what each piece of the puzzle does.
| Component | Meaning | Purpose |
|---|---|---|
v=spf1 |
Version 1 | This is the version tag. It's like a signpost that tells receiving servers, "Hey, this is an SPF record, and it follows version 1 rules." It always has to come first. |
include:_spf.google.com |
Authorize Google | This is the most important part for Google users. The include mechanism essentially says, "Go check Google's own SPF record and trust any server you find there." It’s a brilliant, hands-off way to cover all of Google's massive, ever-changing network of mail servers without you ever having to lift a finger. |
~all |
SoftFail | This is the enforcement rule. The ~ symbol tells other servers how to treat emails that don't come from an approved source. It means, "If the email isn't from Google, it's probably suspicious. You should treat it with caution—maybe mark it as spam—but don't reject it outright." This is Google's official recommendation. |
Understanding these components helps clarify why sticking to the script is so important for your email's deliverability.
Now, what if you need to authorize another service besides Google? You can't just add a second SPF record. Instead, you have to merge them correctly into one. A specialized tool can make this painless. For example, using an SPF record generator can help you combine multiple include statements into a single, valid record, steering you clear of the common syntax errors that can tank your deliverability.
Think of putting your SPF record in place as handing your domain's bouncer the official guest list. It’s a one-time setup that involves adding a specific TXT record to your domain's DNS settings. While every domain registrar's interface looks a little different, the core steps are always the same.
Whether you're using GoDaddy, Namecheap, Cloudflare, or another provider, the process begins when you log into your account and navigate to the DNS Management section. This is your domain's control panel, where you can add, edit, and delete various records like A, CNAME, MX, and, of course, TXT.
Once you’re in the DNS settings, you’ll be creating a new record. The key is to select the correct type and fill in the fields with the right information.
This is where people sometimes get a little lost. You'll see several fields, but for your Google Workspace SPF record, you only need to worry about two or three of them. Here’s a simple breakdown of what to enter:
Record Type: Always select TXT from the dropdown menu. SPF records live inside TXT records, so this part is non-negotiable.
Host/Name: Enter @. This symbol is a universal shortcut that tells the system to apply the record to your root domain (e.g., yourdomain.com). Some registrars might prefer you leave it blank or type your full domain name—if "@" throws an error, a quick check of their help docs will clear it up.
Value/Content: This is where you paste the exact SPF record Google provides: v=spf1 include:_spf.google.com ~all. Be careful not to add quotation marks unless your registrar specifically requires them.
TTL (Time to Live): Just leave this at the default setting. It's usually one hour or set to "Automatic," which is perfectly fine.
This visual shows the simple flow of information your new SPF record establishes: it declares its version, authorizes Google as a sender, and then tells servers how to handle emails that don't comply.
This process creates a clear, verifiable chain of trust that helps receiving mail servers instantly know your emails are legitimate.
This is a familiar cry for help on forums and Reddit. Someone follows the steps perfectly, but their SPF check still comes back with a failure. Nine times out of ten, the culprit is something called DNS propagation.
After you save your new TXT record, it doesn't update across the entire internet instantly. It can take anywhere from a few minutes to 48 hours for the changes to fully "propagate" worldwide. If you run a check immediately after adding the record, it will likely show as not found.
Before you start pulling your hair out, just give it at least an hour. If it’s still not working after a day, then it’s time to double-check for simple mistakes like a typo in the value field or accidentally selecting the wrong record type. These small errors are almost always the cause of validation failures.
For a deeper look into the nuances of this process, our comprehensive guide on proper DNS setup covers these fundamentals in more detail. In the end, a little patience and precision are your best tools here.
Setting up an SPF record for Gmail seems simple on the surface, but a few surprisingly common mistakes can completely torpedo your cold email campaigns. These aren't just minor technical hiccups; they're red flags that tell receiving servers your domain is misconfigured and can't be trusted.
Think of it like getting a single digit wrong on a bank transfer form—the whole transaction fails. The same logic applies here. If you're serious about your emails landing in the inbox, you have to get this right.
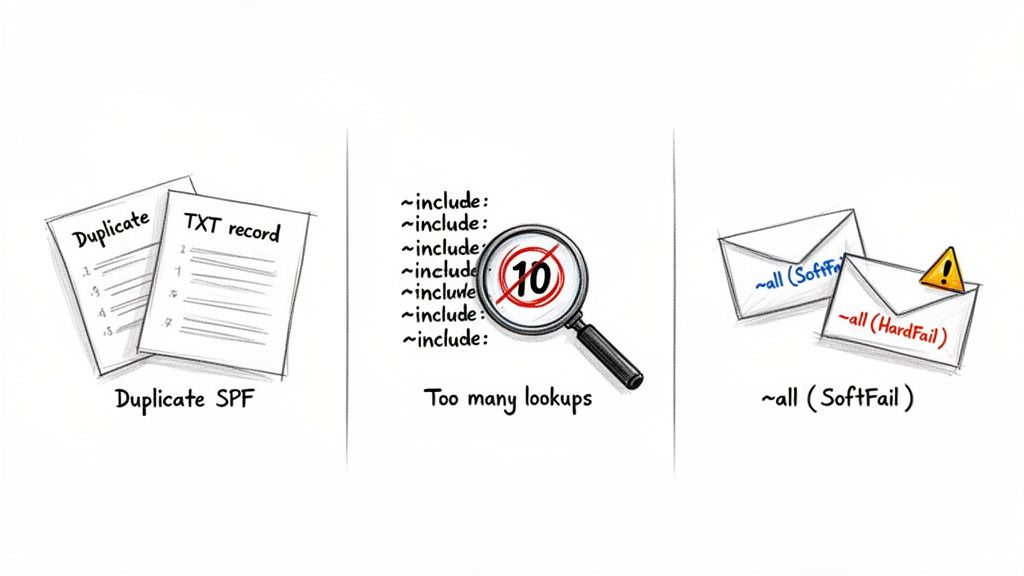
This is easily the most common and damaging mistake we see. When adding a new email service, people often create a brand-new SPF record instead of editing their existing one. This one action instantly invalidates all of your SPF records.
What it looks like: You have two separate TXT records in your DNS settings, and both start with v=spf1.
Why it's a disaster for outreach: The official SPF standard is crystal clear: a domain must not have more than one SPF record. When a mail server sees two, it doesn't try to pick one; it just throws its hands up and returns an error (PermError). This means your emails fail authentication every single time.
You see this play out all the time in forums where someone says, "I added an SPF record for my cold email tool, and now my Gmail deliverability is horrible!" The problem wasn't the new tool—it was creating a second, conflicting record.
Your SPF record authorizes other services using the include mechanism, like include:_spf.google.com. Every time a server sees an include, it has to perform a DNS "lookup" to check the IP addresses for that service. The catch? There's a hard limit of 10 total lookups.
What it looks like: Your one SPF record has a long chain of include statements for Google Workspace, your CRM, your cold email tool, and a half-dozen other services.
Why it's a disaster for outreach: As soon as the 10-lookup limit is hit, any include statements after that are flat-out ignored. If _spf.google.com is number 11 in that chain, your emails sent from Gmail will fail their SPF check, even though the record looks perfectly fine to the naked eye. This absolutely tanks your sender reputation.
~all vs. -allThe very last part of your SPF record tells receiving servers how to handle emails that don't pass the check. The difference between ~all and -all is subtle but has huge consequences for your email deliverability.
~all(SoftFail): This is a suggestion. It tells servers, "This email looks suspicious, so you should probably mark it as spam, but I'll let you decide." This is what Google recommends for most setups.
-all(HardFail): This is a direct command. It says, "If an email fails the SPF check, reject it outright. Do not deliver it, not even to the spam folder."
While -all provides the strongest protection against someone spoofing your domain, it's a risky move for cold outreach. If you accidentally forget to add a legitimate sending service to your SPF record, those emails will be blocked completely. Unless you have an ironclad, unchanging list of senders, it's much safer to stick with ~all.
The stakes are high. Getting these technical details right is what separates professional outreach operations from amateurs who burn through domains. A proper setup signals to inbox providers that you're a legitimate sender, which directly impacts your ability to land in the primary inbox.
Alright, you've added the SPF record to your DNS settings. But your work isn't quite done yet.
Now you need to make sure the change is live and that the rest of the internet can actually see it. Think of it like double-checking your work on a test—this final step ensures your digital bouncer has the correct guest list and is ready to do its job.
Fortunately, you don't have to fly blind. There are plenty of free, powerful tools out there that can instantly check your work. Using a dedicated SPF record checker or a classic like MXToolbox gives you a clear pass or fail grade on your setup. Just pop in your domain name, and the tool will query the public DNS to see what it finds.
When it's working correctly, you'll see your exact SPF record, usually with a big green checkmark or a "Pass" status. This confirms that include:_spf.google.com is present and properly configured. That's the validation you need before you even think about starting your email outreach.
But what happens if the check comes back with an error? Seeing a "No SPF Record Found" or "Too Many Lookups" message is frustrating, especially when you're sure you followed all the steps. It's a common story you'll find all over tech forums and Reddit, but the fix is usually pretty simple.
Before you start pulling your hair out, just run through this quick diagnostic checklist. These four steps solve over 90% of verification issues and will save you a massive headache.
Check for Typos: Seriously. A single misplaced character in v=spf1 include:_spf.google.com ~all can break the whole thing. The easiest way to be sure is to copy and paste it again.
Confirm the Record Type: Your SPF record has to be a TXT record. It's surprisingly easy to accidentally create it as an A, CNAME, or MX record, which makes it totally invisible to verification tools.
Verify the Hostname/Name: For your main domain (the "root"), the hostname should almost always be the @ symbol. Some providers might want you to use your full domain name or even leave the field blank, but "@" is the universal standard.
Wait for DNS Propagation: DNS changes are usually fast—most propagate within 5-30 minutes. If you just added the record, give it at least 15 minutes before you check it again. In rare cases, it can take up to a few hours.
Troubleshooting your SPF records for Gmail is a process of elimination. Start with the simplest potential errors—like typos and record types—before you start worrying about anything more complicated.
If you've gone through this checklist, waited a bit, and your record still isn't showing up, it's time to head back to your domain registrar's DNS settings. Make sure you actually saved the changes after creating the record.
By methodically working through these common slip-ups, you can confidently fix almost any SPF setup issue yourself and get your emails authenticated and ready for the inbox.
Setting up an SPF record for one domain? No big deal. But what happens when you’re an agency or a sales team juggling dozens, or even hundreds, of domains for outreach? That's when manual setup turns into a massive operational headache.
For every new domain, someone has to log into the DNS provider and get it right. The risk of a simple typo, a copy-paste error, or creating a duplicate record skyrockets with each domain you add. It just doesn't scale.
This is where you need a better system. Instead of treating each setup like a one-off task, modern tools like InboxKit automate the whole authentication process. With a few clicks, you can lock down a domain with perfectly configured SPF, DKIM, and DMARC records, eliminating the chance for human error entirely.
Automation isn't just a time-saver. It's about laying a rock-solid foundation for a high-deliverability cold outreach strategy. Nailing the technical details of your SPF records for Gmail is crucial, but it's only half the battle. Real success comes from pairing that solid tech footing with smart sending practices that build and protect your sender reputation.
Even a perfectly authenticated domain will burn out fast if you don't have a sustainable sending strategy. The trick is to operate within the limits that providers like Google see as normal, legitimate behavior, especially for cold outreach.
The goal is to make your sending behavior look as natural as possible. Sudden spikes in volume, high bounce rates, or a whole army of mailboxes under one domain are all giant red flags for spam filters. Automation handles the DNS, but a smart strategy is what builds your reputation.
Once your domains are automatically authenticated, you need to follow a proven framework to maximize inbox placement and keep your domains healthy for the long run. Remember, this is about cold outreach, not blasting out thousands of marketing emails.
Mailboxes Per Domain: Stick to a hard limit of 3 mailboxes per domain. It's far safer to spread your sending volume across more domains with fewer mailboxes each than to put all your eggs in one basket.
Warmup Duration: You have to warm up every new mailbox for a minimum of 14 days before you even think about launching a real campaign. This process slowly builds a positive sending history and trust with the email providers.
Sustainable Sending Volume: After the warmup is complete, keep each mailbox to just 10–15 emails per day. Yes, a Google Workspace account can technically send up to 2,000 emails a day (consumer Gmail is limited to 500), but that's not the game we're playing. This lower volume is the absolute sweet spot for cold outreach deliverability.
Following these rules ensures your automated technical setup actually delivers real-world results. For a deeper dive into all the practices that get your emails seen, this definitive guide to improving email deliverability is an excellent resource. By combining powerful automation with a disciplined sending strategy, you create a scalable system that consistently lands your messages where they belong: the inbox.
Let's tackle some of the most practical, real-world questions that pop up when you're setting up SPF records for Gmail or Google Workspace, especially for things like cold outreach.
Absolutely not. You can never have more than one SPF record on your domain. This is one of the most common pitfalls I see, often discussed in Reddit threads where someone adds a new email service and inadvertently breaks their entire setup.
When a receiving server sees multiple SPF records (both starting with v=spf1), it can't decide which one is the "real" one. The result? It invalidates all of them, causing authentication to fail across the board. If you need to authorize multiple sending services, you have to merge them into a single record using the include: mechanism.
Think of it this way: An SPF record is your party's official guest list. If you give the bouncer two different lists, they'll get confused and start turning everyone away to be safe.
DNS changes are faster than most people think. When you add or update an SPF record, that information has to spread across the internet's network of servers in a process called propagation.
In practice, most changes take effect within 5-30 minutes. It can occasionally take a few hours, but the old "up to 48 hours" advice is largely outdated that was more relevant years ago when DNS infrastructure was slower.
If you're planning a cold outreach campaign, a good rule of thumb is to set up your record at least a few hours before you start warming up the account. This gives everything time to settle and prevents your first emails from bouncing.
Yes, you definitely do. Even if your domain is purely for receiving mail and you never send from it, an SPF record is a crucial security tool. Without one, your domain is a prime target for spoofing—where attackers forge your domain to send phishing emails.
By publishing a simple, restrictive record like v=spf1 -all, you're telling the world that no email should ever originate from your domain. This effectively slams the door on anyone trying to impersonate you and protects your brand's reputation.
No. SPF records only apply to the exact domain where they're published. An SPF record on yourdomain.com does not protect mail.yourdomain.com, outreach.yourdomain.com, or any other subdomain.
If you're sending from subdomains (a common cold email strategy to protect your root domain), each subdomain needs its own SPF record configured separately.
Google's include:_spf.google.com typically consumes 3-4 DNS lookups on its own because it references nested SPF records internally. Since the SPF spec limits you to 10 total lookups, this leaves you with only 6-7 lookups for all your other services combined.
Plan your SPF record accordingly. If you're using multiple email services and hitting the limit, consider SPF flattening tools that resolve nested includes into direct IP addresses.
Ready to stop wrestling with DNS settings and scale your outreach with confidence? InboxKit handles your entire technical email setup—SPF, DKIM, and DMARC—in just a few minutes, guaranteeing a perfect configuration every time. Get started with InboxKit today!
SPF vs DKIM explained. Learn how they work together, why both are critical for cold email deliverability, and how to configure them to avoid the spam folder.
Read articleDiscover the best free email verification tools to boost deliverability for cold outreach. Compare top options and find the right tool to scale safely.
Read articleLearn how to setup DKIM to improve email deliverability and sender reputation. This guide covers Google, Microsoft 365, and third-party email services.
Read articleInboxKit provides everything you need to reach the inbox consistently